Tracking the Swedish Election: val.digital - JavaZone
My talk at JavaZone this year on how to make your own hobby projects succesful and how to stay succesful. It was well received at the conference, and hope it you feel the same! My hope is that people will take what they know, make simple things and move from there.
Putting content outside the element using CSS (pull to refresh-style)
On mobile a common UI element is to a have “Pull to refresh” control above a scrollable list. This area then contains last updated information or similar.
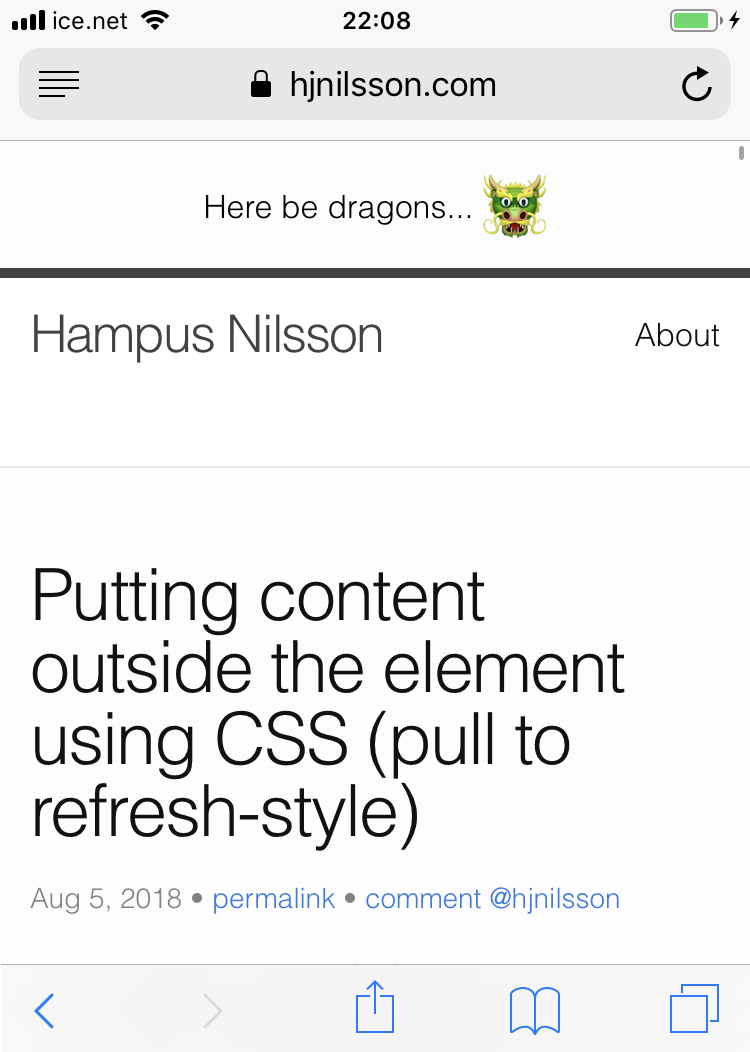
However, if you try to do this naively in HTML, by positioning an element outside the <body>
using position or negative margins, you’ll find the element will not render. This is true
for all browsers.
But: You can work around this using the transform property. By specifying a translate
value, this will move the element outside the body while keeping it visible. The markup
is relatively simple:
<div role="presentation" class="easter-egg">
    Here be dragons...
    <span role="img" style="font-size: 2em; top: 0.15em; position: relative;">
        🐲
    </span>
</div>

<style>
.easter-egg {
    position: absolute;
    width: 100%;
    top: 0;
    left: 0;
    color: black;
    text-align: center;
    z-index: 1000;
    transform: translate3d(0, -60px, 0);
}
</style>
You can try this effect on this page scroll to the top and keep scrolling up (on OSX, Android or iOS) and you will see the element. It will only work on OSX with a trackpad, not using a mouse wheel.
This is a very simple trick that I did not find documented anywhere, delight your users and put something fun for them to discover up top! :)
A simple snake game in pure HTML and JavaScript, part 3
You should first read part 1 and part 2 of the tutorial.
It’s time to complete our small snake game (long timeout between posts due to work). Last time we made the snake move on the board and added keyboard controls. Now all that remains is picking up the apples and collision detection with the tail.
Placing apples
First step is placing the apples on the board.
This is something we will do many times, so we introduce a new function placeApple
that handles this.
Apples should be assigned to a random position, so we pick a random cell on the
board, using the Math.random and Math.floor functions in combination to pick
an integer (non-decimal) number for the X and Y positions. We then update the
board at this position with the property apple set to the value 1.
function placeApple() {
    // A random coordinate for the apple
    var appleX = Math.floor(Math.random() * boardWidth);
    var appleY = Math.floor(Math.random() * boardHeight);

    board[appleY][appleX].apple = 1;
}
Ta place an apple on the board when the game starts, update the startGame function.
Before the final } brace, insert a call to the placeApple() function.
We also need to update the loop in this function to clear all apples on the board.
The end of the startGame function will thus look like this, with a call to the
new function and an updated loop:
// Clear board
for (var y = 0; y < boardHeight; ++y) {
    for (var x = 0; x < boardWidth; ++x) {
        board[y][x].snake = 0;
        board[y][x].apple = 0;
    }
}

// Set the center of the board to contain a snake
board[snakeY][snakeX].snake = snakeLength;

// Place the first apple on the board.
placeApple();
We also need to check in the render loop for the apple value (the same place we check
the board for the snake value) and set a different CSS class if there is an
apple on that spot. In other words, we update the gameLoop function with the following
else if statement.
if (cell.snake > 0) {
    cell.element.className = 'snake';
    cell.snake -= 1;
}
else if (cell.apple === 1) {
    cell.element.className = 'apple';
}
else {
    cell.element.className = '';
}
And finally, add a matching CSS class, to style the apple red on the board:
#board .apple {
    background-color: red;
}
Once these changes have been made, the red apple should appear on the board. You can also look at the source of the below sample.
The final piece of the puzzle, will be to pick up the apples and tail collisions.
Collecting apples
To check if the snake collided with an apple, we will update the game loop with another if statement. Add this after checking if we collided with any walls (as before):
// Collect apples
if (board[snakeY][snakeX].apple === 1) {
    snakeLength++;
    board[snakeY][snakeX].apple = 0;
    placeApple()
}
We check if an apple is present on the cell we are moving to, if that is the case we increase the length of the snake, remove the apple and place a new apple on the board. This makes the game playable:
Collisions with the tail
If you play the game above long enough, you’ll notice you don’t die if you go through your own tail. This is the final thing we need to add to our game.
This requires a very similar check to the one we had for apples, but we instead check if the snake property is set. If it is, we just restart the game. The following if statement goes before the one we added before to pick up apples:
// Tail collision
if (board[snakeY][snakeX].snake > 0) {
    startGame();
}
Mission success
And there you have it, a complete snake game made entirely in simple HTML, JavaScript and CSS. Try it out below:
After revelling in your success, we can note there are still bugs to be fixed:
- Apples can be placed ontop of the snake, making them invisible! In
placeApplewe should prevent this by always finding a free position on the board. - You can walk backwards and collide with yourself. We should check in
enterKeythat we don’t reverse the direction of the snake.
After fixing the bugs, try to extend the game. Here are some ideas on what can be done:
- Replace the snake and Apple with cooler graphics, try using
background-image. - Golden apples that give three times the length extension, but disappear if you don’t pick it up fast enough.
- A score display to show the user how many apples they picked up.
- Continuing on score, a high score table. And maybe store it in
localStorageso it persists? - Only start the game after the user gives some input after dying.
- Mobile support is atrocious, try to make it playable on an iPhone!
- Maybe don’t using
1000 / snakeLengthfor timeout, as the game quickly becomes impossible due to the speed. Try some other formula that is more fair.
Enjoy, and if you make any improvements, please let me know!
WWDC - Designing fluid interfaces
Very interesting insight into how Apple is trying to make their devices more like physical objects and how that makes them feel more “magical”. It is impressive to get insight into how they prioritise small details.
Most fascinating demo is at 9:15 in the video. Here they show off how in iOS 12, you are able to change what you are doing as it is happening. For example if you are opening an app, you can abort it and “throw it back” to close it on the homescreen.
A simple snake game in pure HTML and JavaScript, part 2
You should first read part 1 of the tutorial.
This is the second part of our quest to make a simple Snake game in the browser. In this part, we will code the game loop, rendering and controls for the game.
We left off with an empty game board in part 1, with the game state set up. Now it’s time to start implementing the game logic. You can view the result from part 1 here, right click → View Source to see the code.
The game loop
First thing we’ll do is to make the game loop. The game loop is a generic term for the code that constantly runs in the background inside games. This way, games are different from most other programs in that they require no input from the user to do things. Think about it, most computer programs do not do anything unless you click a key, move the mouse or tap a button. But games always do something, even when the user is just looking at the screen. The code that runs constantly in the background, is called the game loop.
To run the game loop; we will create a new function. We call it simply gameLoop.
This function will run repeatedly during the duration of the game. It will handle
rendering and moving the snake around the board.
    function gameLoop() {
        // This function calls itself, with a timeout of 1000 milliseconds
        setTimeout(gameLoop, 1000);
    }
The setTimeout call will the the function again, recursively, every second so
that any code inside will run repeatedly in the background.
We also need to start the loop by adding an initial call to gameLoop at
the end of the startGame function:
    function startGame() {
        // ... code from before
        startGame();

        // Start the game loop (it will call itself with timeout)
        gameLoop();
    }
The next step is to iterate over the entire board and update the DOM
(ie. the HTML div elements we created in part 1) with a different
CSS class if the corresponding cell contains the snake.
We do this by looping over the Y and X axes, and checking if the board
has a snake, if so, we set the element’s class to "snake". Else we
remove any class set.
function gameLoop() {
    // Loop over the entire board, and update every cell
    for (var y = 0; y < boardHeight; ++y) {
        for (var x = 0; x < boardWidth; ++x) {
            var cell = board[y][x];

            if (cell.snake) {
                cell.element.className = 'snake';
            }
            else {
                cell.element.className = '';
            }
        }
    }

    // This function calls itself, with a timeout of 1000 milliseconds
    setTimeout(gameLoop, 1000);
}
We also need to style the snake class, so it looks like a snake (green).
Add the following inside the <style> tag to do that:
#board .snake {
    background-color: green;
}
Now when we refresh the page, the center element on the board should be green. It should look like the example below.
Now that the initial snake is visible, we need to make it to move around the board.
Moving the snake
To make the snake move, we need to extend the game loop.
Before we update the board, we should look at what direction the snake is heading.
Using the direction, we update the position
of the snake (the snakeX and snakeY global variables) accordingly. Then we also
need to update the board (the board[y][x].snake variable). When the board is
updated, it will automatically update div element with the snake class, because
the code that does that will follow immediately after our check.
So what does this look like in code? We have the snakeDirection global variable
to define the direction the snake is heading, right now it always has the value "Up",
but we also need to check for "Left", "Right", "Down". For each direction,
we change the value of either snakeX or snakeY by 1. Changing snakeY will move
the snake either up or down, changing snakeX will move the snake left or right.
Remember that snakeX = 0 and snakeY = 0 is the upper left of the board. So
to make the snake move right, we increase snakeX. To make it go down, we increase
snakeY. And the reverse for left and up. In code, it looks like this:
    // Update position depending on which direction the snake is moving.
    switch (snakeDirection) {
        case 'Up':    snakeY--; break;
        case 'Down':  snakeY++; break;
        case 'Left':  snakeX--; break;
        case 'Right': snakeX++; break;
    }

    // Update the board at the new snake position
    board[snakeY][snakeX].snake = 1;
After updating the snake position, we also update the board at the new position
to set the snake as present. This code should be inserted inside gameLoop before
the double for-loops.
When you run the code, this should be the result:
As you can see, the snake moves up the board slowly, since the direction is always "Up",
the next step will be to make it possible to change the direction of the snake.
Handling input
Next step is handling input. Input will be done using the keyboard (sorry, mobile readers).
To capture this we need to bind the onKeyDown event. We check what key was pressed and
update the snakeDirection accordingly.
We create a new function to do this, called enterKey
    function enterKey(event) {
        // Update direction depending on key hit
    }
We also need to add the onkeydown event handler to the body element.
Here we already have one event handler to initializes the game, so add another
one that handles the key presses:
<body onload="initGame()" onkeydown="enterKey(event)">Inside the function, we will use the another switch statement to check what key was pressed — in this case we check for all the arrow keys — and update the direction of the snake. This will then automatically get picked up by the game loop and the we will be able to control the snake!
    function enterKey(event) {
        // Update direction depending on key hit
        switch (event.key) {
            case 'ArrowUp': snakeDirection = 'Up'; break;
            case 'ArrowDown': snakeDirection = 'Down'; break;
            case 'ArrowLeft': snakeDirection = 'Left'; break;
            case 'ArrowRight': snakeDirection = 'Right'; break;
            default: return;
        }

        // This prevents the arrow keys from scrolling the window
        event.preventDefault();
    }
The call to preventDefault is necessary, so that pressing the arrow keys do not perform their
default action (that scrolls the page up/down/left/right).
Try the link below to try it out, note that if you collide with the walls, the game will crash and you can’t play any more. If that happens, refresh to restart the game.
Try out controlling the snake in a new tab
The walls
Let’s fix that bug with the walls that makes the game crash, and we’ll have a controllable snake game!
To check for the walls, we simply need to add an if statement inside the game loop
after updating the snake position. This will check if the new position is outside the
board by comparing against 0 (snake can’t be on a negative position) and boardWidth/boardHeight.
If we detect that the snake is outside the board, we restart the game by calling startGame,
this will reset both the position, length and direction of the snake.
// Check for walls, and restart if we collide with any
if (snakeX < 0 || snakeY < 0 || snakeX >= boardWidth || snakeY >= boardHeight) {
    startGame()
}

// Update the board at the new snake position
board[snakeY][snakeX].snake = 1;
We also need to update startGame to clear the board from the snake, so the old
snake is not visible when the game restarts. Add the following for loop inside
startGame to do that:
// Clear the board
for (var y = 0; y < boardHeight; ++y) {
    for (var x = 0; x < boardWidth; ++x) {
        board[y][x].snake = 0;
    }
}
Now we can play the game without it crashing. Try it out by clicking below and playing using the arrow keys:
However, the snake remains on the board as we move around. So we have one thing left on the todo list.
Making the snake disappear
To remove the snake, we need to keep track of the tail.
We can use the board to store this information. So rather than trying to keep track of where different snake segments are on the board. We store how many more iterations of the game loops the Snake should be visible in every cell.
We then simply decrease this as we iterate over the board.
We need to make a few small changes to accommodate this. First, we need
to replace the assignments board[snakeY][snakeX].snake = 1; to assign
the snakeLength instead. So find the two places with that piece of code and
replace with: board[snakeY][snakeX].snake = snakeLength;
Now, instead of just storing if there is a snake on the board, we store the remaining length of the snake on that cell.
The next part is changing the loop over the entire board. Instead of checking for cell.snake,
we want to check if the value is greater than zero. If so, there is a snake on that cell,
so we still set the snake class, but we also decrease the value of cell.snake by 1.
The update code inside the game loop will look like this:
var cell = board[y][x];

if (cell.snake > 0) {
    cell.element.className = 'snake';
    cell.snake -= 1;
}
else {
    cell.element.className = '';
}
Finally I also decreased the setTimeout call to 1000 / snakeLength. This make the speed of the game dependent on the length of the snake. Try out the result below:
Now we have an almost playable version of the game. All that remains is collecting those delicious apples (and not being able to move through yourself). We’ll write this code in the next part.
Read part 3 of the tutorial.
Progressive Web Apps on iOS are here
The fundamentals for making a PWA is finally supported on iOS. Maximiliano Firtman has wrote up the basic sets of technologies now supported (and a long list of what is still missing).
So you are right, you can now install apps on iOS without App Store approval. That’s probably one reason Apple didn’t mention at all about this new ability; they might not want to confuse users. Not even the release notes on Safari mention the technologies.
Overselling the abilties of PWAs on iOS slightly — it’s not all the way there to making a real app yet!
Creating a CloudSQL server instance from a database dump
For a project based on the Google Cloud Platform recently, one of the very first things that came up was how to easily set up a new database from scratch on the platform from the command line, so that we could automate it to quickly set up new development environments.
To be able to do this, you must install the Google Cloud Command Line Tools as well as login to your account on the command line.
Configuration
These are the variables that will be used for the script with reasonable defaults.
GCLOUD_DEV_PROJECT="$(gcloud config get-value project)"
CLOUDSQL_DEV_BUCKET="cloudsql-devbucket-$(whoami)"
CLOUDSQL_INSTANCE="cloudsql-dev-$(whoami)"
CLOUDSQL_DB_NAME=application
We need the name for a temporary Google Storage bucket to store the dump in, the name for the CloudSQL instance we should create, the Google Cloud project to fetch the data from (here we use the current project by calling the gcloud command line tool) as well as a name for the database to create on the SQL server.
Bucket to hold SQL database dump
To be able to import a SQL dump into CloudSQL, it needs to be uploaded to a
Google Storage bucket. If you already have one for the project, you can reuse
it. If not, create a new bucket to hold this data (change the region eu to your own):
gsutil mb -c nearline -l eu \
    -p $GCLOUD_DEV_PROJECT gs://$CLOUDSQL_DEV_BUCKET
Then to copy your local database dump (we assume the name is: a_mysql_dump.sql)
up to Google Storage, run the following command:
gsutil cp a_mysql_dump.sql gs://$CLOUDSQL_DEV_BUCKET/dump.sqlCreate SQL instance and database
To create the database, you use the create command from the gcloud command line tools. Here you specify the instance size, what region the instance should be in, and what version of MySQL (or Postgres) the server should run. You can easily change this to match your needs.
gcloud sql instances create $CLOUDSQL_INSTANCE \
    --tier=db-g1-small \
    --region=europe-west3 \
    --database-version=MYSQL_5_7
Then to create the database on the server, you need to run another command.
gcloud sql databases create $CLOUDSQL_DB_NAME \
    --instance $CLOUDSQL_INSTANCE
If you are doing the setup from a script, it usually takes 10-15 seconds before the instance accepts
incoming SQL connections. So add a sleep 20 timeout after this command if you are making a script.
You should also set a root password that you can use to login in to the instance;
gcloud sql users set-password root % \
    --instance $CLOUDSQL_INSTANCE --password "AGreatPassword"
You can use this command to set the password for any SQL user, simple change the root % to the
user you wish to update.
Give access to service account
You need to give access to the service account on the CloudSQL server, to the storage bucket where the database dump is stored. You do this by first fetching the service account email of the SQL server:
# This gives you email with a some extra text
gcloud sql instances describe $CLOUDSQL_INSTANCE | grep serviceAccountEmailAddress

# This will only give you the email (using cut)
MYSQL_SERVICE_ACCOUNT=$(gcloud sql instances describe $CLOUDSQL_INSTANCE | grep serviceAccountEmailAddress | cut -d" " -f 2)
The email will be some gibberish like: lh6srs65thehhcwv22hv33jygu@dirty-banana-80.iam.gserviceaccount.com
To grant access to the bucket, run the following two commands. You need to give write access to the bucket, and read access to the database dump file.
gsutil acl ch -u $(MYSQL_SERVICE_ACCOUNT):W gs://$CLOUDSQL_DEV_BUCKET
gsutil acl ch -u $(MYSQL_SERVICE_ACCOUNT):R gs://$CLOUDSQL_DEV_BUCKET/dump.sql
(it will not work without write access to the bucket, belive me I’ve tried)
Import database
After all this setup, we are finally ready to import the dump into the CloudSQL
database. This is done by running gcloud sql import
pointing it the the file we uploaded to the storage bucket:
yes | gcloud sql import sql $CLOUDSQL_INSTANCE $MYSQL_IMPORT_DUMPIf this results in the incredibly unhelpful ERROR: (gcloud.sql.import.sql) ERROR_RDBMS this means there is an error in your SQL database file (or that you did not
grant the proper permissions to the Google Storage bucket). Unfortunately there is no real way to get
the actual error from the server. You can try importing the dump to a local MySQL server to see
the error.
And that’s it! You should now have a fresh CloudSQL server, with your database dump loaded. Enjoy!
A simple snake game in pure HTML and JavaScript, part 1
Many people who are starting out with a new project get caught up in deciding on technologies, what frameworks to use and what database to pick. When often — especially if you are a beginner — it is a better idea to just get started, and make something with the tools you know.
This is the first part of a tutorial that will show how you can build a snake game in less than a hundred lines of JavaScript, without any frameworks. There is some HTML and CSS in addition, but nothing scary. Any beginner to the web platform should be able to go through the guide, and experienced developers will learn something new as well.
Getting started with Snake
Start with an empty HTML document and open it in Chrome. Insert the following code that just sets up a HTML document with style / script tags and a function to set up the game.
<!DOCTYPE html5>
<html>
<head>
<title>Snake in pure HTML/JavaScript/CSS</title>
<style>
    html {
        text-align: center;
        font-family: Helvetica, Arial, Helvetica, sans-serif;
    }
</style>
</head>
<body onload="initGame()">
    <h1>Simple Snake</h1>
    <div id="board"></div>

    <script>
    function initGame() {

    }
    </script>
</body>
</html>Let’s start from the top: The head tag. In here we have a title to put a document
title on the page, as well as a style tag containing styling to center the contents
of the page horizontally and change the font to a sans-serif one.
The the body element, which contains a h1 element with the title of the game and
a single div element that will contain the game board. We have it tagged with the id ‘board’
so we can access the element from JavaScript. We also have a script that will soon contain
all of our game logic.
The body element also has an onload handler, which calls the initGame function
defined in the script tag. This means that once the document is completely loaded,
the code inside initGame will run. There is nothing there yet, so lets’ get started!
Note: If you view the source code on all examples, there will be a script tag at the bottom that handles integration with the iframe when the examples are included on this page. You can inspect it if you like, but it is not necessary to understand it.
Creating the board
We’ll start out by creating the game board.
The board will be represented as a two-dimensional array, that is, an array of arrays.
We create this as a constant variable inside the script tag called board, we also
define the width and height of the board with two constant variables. Here I have
arbitrarily picked 26 by 16 cells (this is a convenient size to fit on screen).
<script>
const board = [];
const boardWidth = 26, boardHeight = 16;

function initGame() {
    // Logic to come
}
</script>
To make it simple, we’ll build the entire board out of div elements, and will style
these to look like cells, apples and the snake. We create these diivs by iterating over
the Y and X axes, creating columns and rows of items:
function initGame() {
    for (var y = 0; y < boardHeight; ++y) {
        for (var x = 0; x < boardWidth; ++x) {
            var cell = {};
        }
    }
}
Each cell will be defined by an empty object {}. In this object we will put the state for each cell.
We need to fetch the board from the DOM (remember the <div id="board></div>"?). We
do this using document.getElementById and store it in a variable. This is done outside
the loops.
For every cell, we create a div element on the board via document.createElement.
Then we add this cell to the boardElement, meaning every cell will have a matching div in the DOM.
function initGame() {
    const boardElement = document.getElementById('board');

    for (var y = 0; y < boardHeight; ++y) {
        for (var x = 0; x < boardWidth; ++x) {
            var cell = {};

            // Create a <div></div> and store it in the cell object
            cell.element = document.createElement('div');

            // Add it to the board
            boardElement.appendChild(cell.element);
        }
    }
}
You can use the developer tools for Chrome to look at the document structure, and you will see all the elements.
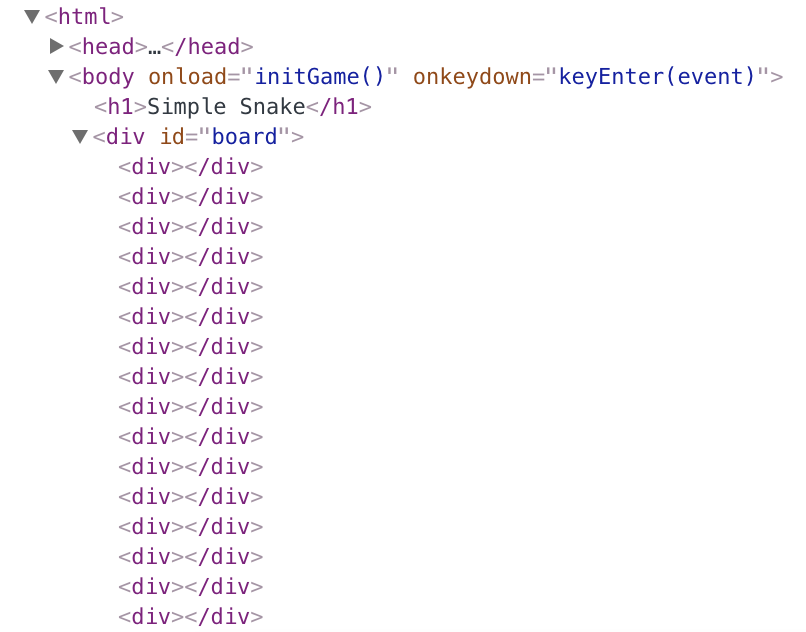
Finally, we need to store all these cells inside the board array of arrays.
We do this by creating an array for every row, and pushing the cells into
this row in the inner loop, and every row into the board array for every
outer loop, giving us our final initGame function:
function initGame() {
    for (var y = 0; y < boardHeight; ++y) {
        var row = [];
        for (var x = 0; x < boardWidth; ++x) {
            var cell = {};

            // Create a <div></div> and store it in the cell object
            cell.element = document.createElement('div');

            // Add it to the board
            boardElement.appendChild(cell.element);

            // Add to list of all
            row.push(cell);
        }

        // Add this row to the board
        board.push(row);
    }
}
However, if you run this code, nothing will show up. This is because div
elements by default are invisible, we need to give the some styling to make
them visible on the page.
To make the divs visible, we assign them a black background color, a width and a
height. We do this using CSS, by adding some code inside the <style> tag in the template.
To style the cells we use the #board div selector. This targets all the
div elements inside the element with the id board.
If you try only this they will all lay out in a loooong column down the page that is 24 pixels wide. To fix this, we need to float the elements. This moves them around so that there is not a line break after every element. Instead the page will now display as rows and columns of solid blocks.
#board div {
    background-color: black;
    border: 1px solid grey;
    box-sizing: border-box;
    float: left;
    width: 24px;
    height: 24px;
}The box-sizing property is necessary so that the width of the borders don’t make the
cells wider than 24px. You can
read up on box-sizing if you are curious about this.
If you view the above example, you will notice that the grid is not square,.
We also need to limit the board in width, so that the grid is only 26 cells
wide. We specify the width of #board to be 26 * 24px, and use the calc
function in CSS to not have to calculate this number manually. The margin: auto
means that the board will be centered horizontally on-screen.
#board {
    width: calc(26 * 24px);
    margin: auto;
}
We now have a black grid for the snake game!
It is not very interesting yet though, because we don’t have any snake on the game board to control.
Keep track of the game state
Next we need to add the snake to the board. We start by defining the properties the snake has in this game, there are a few:
- Direction — The snake is moving either left, right, up or down. We can store this as strings
'Up','Down','Left'and ‘Right’. - Position — Defined as a X and Y position on the board. Note that 0, 0 will be top left on the board and 25, 15 will be bottom right.
- Length — Length of the snake in segments.
Let’s create global variables for these properties:
// Add this after the global <script> tag
var snakeX;
var snakeY;
var snakeDirection;
var snakeLength;
We also need to store the tail of the snake. To keep track of this, we store the information about the tail in the board. So we’ll add a property snake to every cell on the board.
We’ll give it an integer value of 0 to denote that the snake is not on the space (at the start of the game).
// Update this inside the initGame function
var cell = {
    snake: 0
};
Start the game
We also need to give some default values to the snake properties. We’ll do that in a new startGame function. This function will set all the properties to default values at the start of the game.
The snake will start moving upwards, with a length of 5 segments.
It will start in the center of the board (divide width and height by 2), we need to use Math.floor
here to round down, since if the board width is 25, 12.5 is not a meaningful position on the grid.
function startGame() {
    // Default position for the snake in the middle of the board.
    snakeX = Math.floor(boardWidth / 2);
    snakeY = Math.floor(boardHeight / 2);
    snakeLength = 5;
    snakeDirection = 'Up';

    // Set the center of the board to contain a snake
    board[snakeY][snakeX].snake = 1;
}
Why create a new function for this? We could just use default values for global variables? The reason is we also need to do the same thing when the player dies to reset the game state, by putting it in a function we can reuse.
In other words: initGame will only run once for the entire application, but startGame will run multiple times.
Add a call to startGame from the end initGame (before the final }). With this
addition, we’re done with the first part of the tutorial.
Wrapping up
Next time, we will make the snake visible on the board and implement keyboard controls, so that you can steer it around the board using the keyboard.
Continue with part 2 of the tutorial.
subscribe via RSS